Running MagAO-X from your own computer
MagAO-X can be operated entirely remotely as long as the prerequisites (power, dry air, networking) are met. The easiest way to adjust settings is with the web UI, but for full control you will want to set up the various other GUIs.
This document explains how to install MagAO-X in a virtual machine (VM). The VM can then be deleted and recreated as many times as you like without interfering with your host machine.
Configuring the virtual machine is done from the command line. Example commands are shown after a $ or ubuntu@magao-x-vm:~$ (which you don’t type yourself as part of the command), and output is on un-prefixed lines.
You will want to first install Multipass, a virtual machine manager specifically for Ubuntu Linux VMs on Linux, Windows, and macOS computers. Follow the instructions on their website to install.
Create the virtual machine
Windows users note: you should run multipass set local.privileged-mounts=true to enable file transfers. Read here about the security implications this setting has for Windows.
In a new terminal window, to create a VM with Ubuntu version 22.04:
$ multipass launch -n magao-x-vm 22.04
Launched: magao-x-vm
You should mount your home directory into the VM:
$ multipass mount $HOME magao-x-vm:/home/ubuntu/Home
Next, verify you can connect to the VM and get a shell prompt:
$ multipass shell magao-x-vm
[... some lines omitted ...]
ubuntu@magao-x-vm:~$
Notice that the shell prompt has changed to ubuntu@magao-x-vm:~$. Commands within the VM will be prefixed with ubuntu@magao-x-vm:~$ (though ~ may change), and “host” commands will continue to be prefixed with $. Your home directory will be available inside the VM under ~/Home. This is one way to get files into and out of the VM.
$ ls ~/Home
[... list of all your files ...]
Now, exit the VM shell:
ubuntu@magao-x-vm:~$ exit
$
The first thing to do after creating the VM is to stop it (which is just like shutting down a “real” physical computer) and adjust some settings:
$ multipass stop magao-x-vm
$ multipass set local.magao-x-vm.disk=20GiB
$ multipass set local.magao-x-vm.cpus=4
$ multipass set local.magao-x-vm.memory=8G
This ensures you have enough space in the VM to install the MagAO-X software. (You can change the number of CPUs allocated to the VM to a number other than four if you want.)
Now, boot the virtual machine:
$ multipass start magao-x-vm
You will see the message “Starting magao-x-vm” and a loading spinner. When the VM has started, you will be back at your host shell prompt. Wait a minute for the VM to start, then connect your terminal to the VM with:
$ multipass shell magao-x-vm
ubuntu@magao-x-vm:~$
Authentication Error
Also, in the unlikely event you encounter this error (maybe upon reinstalling multipass):
The client is not authenticated with the Multipass service.
Please use 'multipass authenticate' before proceeding.
this forum post explains recovery steps.
Resetting the VM
If you need to reset the VM, start by copying any data you need out of it (e.g. to ~/Home). Then, to delete it forever, use these commands:
$ multipass stop magao-x-vm
$ multipass delete magao-x-vm
$ multipass purge
To recreate the VM, follow the instructions from the top of the page again.
Install MagAO-X Software
Next, within the VM, obtain a copy of the MagAO-X software and install scripts. Using git we clone the MagAOX repository:
ubuntu@magao-x-vm:~$ git clone --depth=1 https://github.com/magao-x/MagAOX.git
Cloning into 'MagAOX'...
remote: Enumerating objects: 1040, done.
remote: Counting objects: 100% (1040/1040), done.
remote: Compressing objects: 100% (907/907), done.
remote: Total 1040 (delta 166), reused 642 (delta 100), pack-reused 0
Receiving objects: 100% (1040/1040), 2.13 MiB | 1.04 MiB/s, done.
Resolving deltas: 100% (166/166), done.
Go to the setup subdirectory:
ubuntu@magao-x-vm:~$ cd MagAOX/setup/
Run the provisioning script:
ubuntu@magao-x-vm:~/MagAOX/setup$ bash provision.sh
Now, wait a while. Don’t be alarmed by the amount of output! Provisioning is very noisy, and messages in red aren’t necessarily errors. Successful provisioning will end with the message
Provisioning complete
You now need to log out and back in for group changes to take effect
As the message says, you should exit the VM with exit, and return to your host command prompt. Now, on to Usage.
What to do if you don’t see Provisioning complete
Most likely that means an error occurred running the provisioning
scripts and they did not finish. That can happen if a big download gets
interrupted, for example. It’s always safe to run bash provision.sh
again. It’ll re-run only necessary steps, which may be enough to get you to
Provisioning complete.
If that doesn’t resolve the issue, you’ll need the complete provisioning
output to get help. The following command will save it to a file
provision.log in your home folder on the host machine, which you can then email or Slack to someone who can help.
ubuntu@magao-x-vm:~/MagAOX/setup$ bash provision.sh | tee ~/Home/provision.log
Usage
Configuring the VM to connect
Before you can remotely control MagAO-X, a little post-provisioning configuration is required. You must have a user account on MagAO-X with an SSH key file configured. For the preconfigured tunnels to work, that key must not have a passphrase.
If you have a key pair in your computer’s ~/.ssh/ folder, this appears at ~/Home/.ssh/ in the VM. (Note: RSA keys are not allowed.) Copy it into place:
$ multipass shell magao-x-vm
ubuntu@magao-x-vm:~$ cp ~/Home/.ssh/id_* ~/.ssh/
ubuntu@magao-x-vm:~$ chmod u=r,g=,o= ~/.ssh/id_*
Next, you will need to edit the VM’s ~/.ssh/config file to add your username. Still within the VM, open a text editor:
ubuntu@magao-x-vm:~$ nano ~/.ssh/config
At the end of the file, the line User YOURUSERNAME should be changed to reflect your MagAO-X username. Save and exit.
Connecting to the VM
The rest of this section should be done within a VM except where otherwise noted.
Note: under some circumstances you will get a worrying-sounding message about Xauthority. As long as things are working, it should be ignored.
Check connectivity to MagAO-X
To ensure everything’s configured correctly, from a multipass shell
session run ssh aoc, verify your shell prompt changes to exao1, then exit:
ubuntu@magao-x-vm:~$ ssh aoc
[you@exao1] $ exit
ubuntu@magao-x-vm:~$
Start tunnels
The xctrl script is installed during provisioning, and a default set
of apps is configured to run on xctrl startup. These apps launch SSH
tunnels to the instrument.
The proclist for VM usage is in magao-x/config/proclist_vm.txt.
Running xctrl startup to start the tunnels should result in output
like:
ubuntu@magao-x-vm:~$ xctrl startup
Session vm_aoc_milkzmq does not exist
Session vm_aoc_indi does not exist
Created tmux session for vm_aoc_milkzmq
Created tmux session for vm_aoc_indi
Executed in vm_aoc_milkzmq session: '/opt/MagAOX/bin/sshDigger -n vm_aoc_milkzmq'
Executed in vm_aoc_indi session: '/opt/MagAOX/bin/sshDigger -n vm_aoc_indi'
And you can check their status with xctrl status or xctrl peek.
ubuntu@magao-x-vm:~$ xctrl status
vm_aoc_indi: running (pid: 6147)
vm_aoc_milkzmq: running (pid: 6148)
(For the SSH tunnel apps, this can be misleading, as “running” doesn’t necessarily mean “connected”. That is why we checked that ssh aoc worked separately, above.)
Using GUIs in the VM
The VM is configured to be “headless”, meaning there’s no graphical display window. It is possible to run a virtual desktop with multipass, as described in their docs for “Using RDP”. However, it’s better to show MagAO-X software in windows that you can move around like other applications on your computer.
The way to do this is with X11 (the next section of their docs). Most Linux systems support X11 applications by default, but you will need to install XQuartz on macOS, if you haven’t already.
Windows users should consult the Multipass docs for their options. It appears that VcXsrv is the most up-to-date free option for a Windows X11 server, downloadable here.
If you’re unfamiliar with SSH X forwarding, the short version is that
the app runs on the VM but the window pops up like any other window on
your own computer (the host). SSH (i.e. multipass shell) is the
transport that moves information about the window like mouse clicks and keypresses back and forth to the
GUI app, which lives inside the VM.
+------------------------------------------+
|                  +----------------------+|
|    Host OS       |          VM          ||
|                  |                      ||
|  [GUI window] <-SSH-> [MagAO-X GUI app] ||
|                  +----------------------+|
+------------------------------------------+
Assuming you have an SSH key on your host computer already, we need to teach multipass about it. Back on the host computer, we do:
$ multipass exec magao-x-vm -- bash -c "echo `cat ~/.ssh/id_ed25519.pub` >> ~/.ssh/authorized_keys"
(Note the difference between the backtick quote and the straight single quote is important here.)
This adds the key as an authorized one for connecting to the VM. (We were connecting a different way when we did multipass shell earlier.)
The following incantation will connect a GUI-capable SSH session to your multipass VM and leave you at a VM prompt:
$ ssh -Y ubuntu@$(multipass exec magao-x-vm -- hostname -I | awk '{ print $1 }' )
ubuntu@magao-x-vm:~$
(If prompted with Are you sure you want to continue connecting (yes/no/[fingerprint])? just say yes.)
So, to start the coronAlignGUI, you could do…
$ ssh -Y ubuntu@$(multipass exec magao-x-vm -- hostname -I | awk '{ print $1 }' )
ubuntu@magao-x-vm:~$ coronAlignGUI
…and the coronagraph alignment GUI will come up like any other window on your host machine.
Be careful! Anything you do with these GUIs controls the real instrument (which is sort of the point, but it bears reiterating).
Viewing camera outputs
The realtime image viewer rtimv is built during provisioning. To get
up-to-date imagery from the instrument, we can use
jaredmales/milkzmq, a set of
programs that relay shared memory image buffers from one computer to
another.
The AOC workstation runs a mzmqServer process that re-serves the
images it replicates from the rest of the instrument using compression
and a limit of 1 FPS. This ensures it doesn’t overwhelm your home
internet connection.
(Napkin math: 1024 * 1024 * 16 bit, or one camsci1 frame, is ~2
MB. 2 MByte / second is 16 Mbit / second, more than compressed HD video
streams. And that’s just one camera!)
The list of images re-served by AOC is kept in
/opt/MagAOX/config/mzmqServerAOC.conf (view on
GitHub).
Establish a milkzmq connection for the cameras you want
After confirming the tunnel vm_aoc_milkzmq is running
(xctrl status), start a milkzmqClient. For this example we’ll
connect to camwfs and camwfs_dark:
ubuntu@magao-x-vm:~$ milkzmqClient -p 9000 localhost camwfs camwfs_dark &
(We’ve used & at the end of the command to background the client, so
just hit enter again to get a normal prompt back after its startup
messages.)
Launch rtimv
The configuration in /opt/MagAOX/config includes rtimv config
files named for the various cameras (see the shmim_name options in
those files for hints about which images to replicate for a given
camera).
Start the viewer with
ubuntu@magao-x-vm:~$ rtimv -c rtimv_camwfs.conf
and it should pop up a window like this:
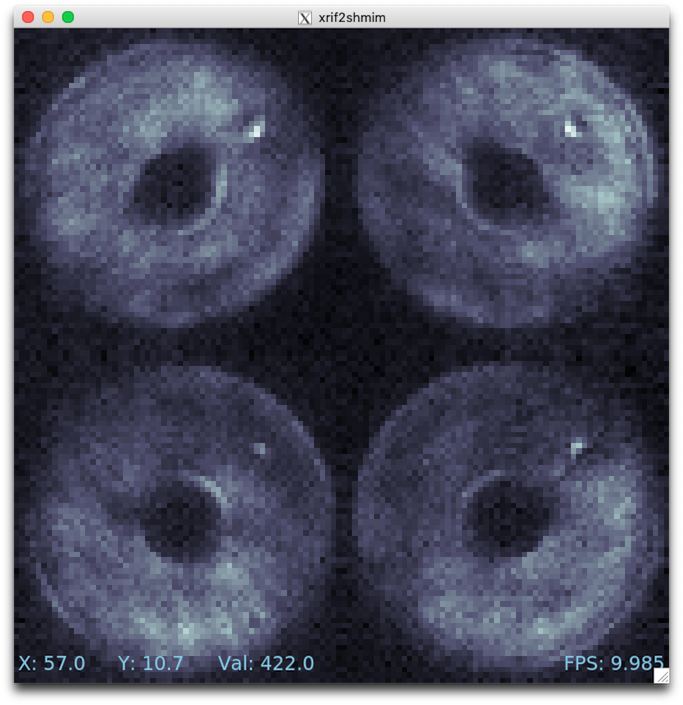
Example of rtimv viewer with 4 wavefront sensor pupils
For instructions on rtimv, consult its user guide.